02 - Moving Things
Before we get started: It is easy to get lost in code as a beginner. There are many things that can throw you off, so it really is a good idea to have a plan on what you want to achieve. This plan can just be some doodles or scribbles, just anything that will get you away from the code and into your personal design thinking space.
Scribbles
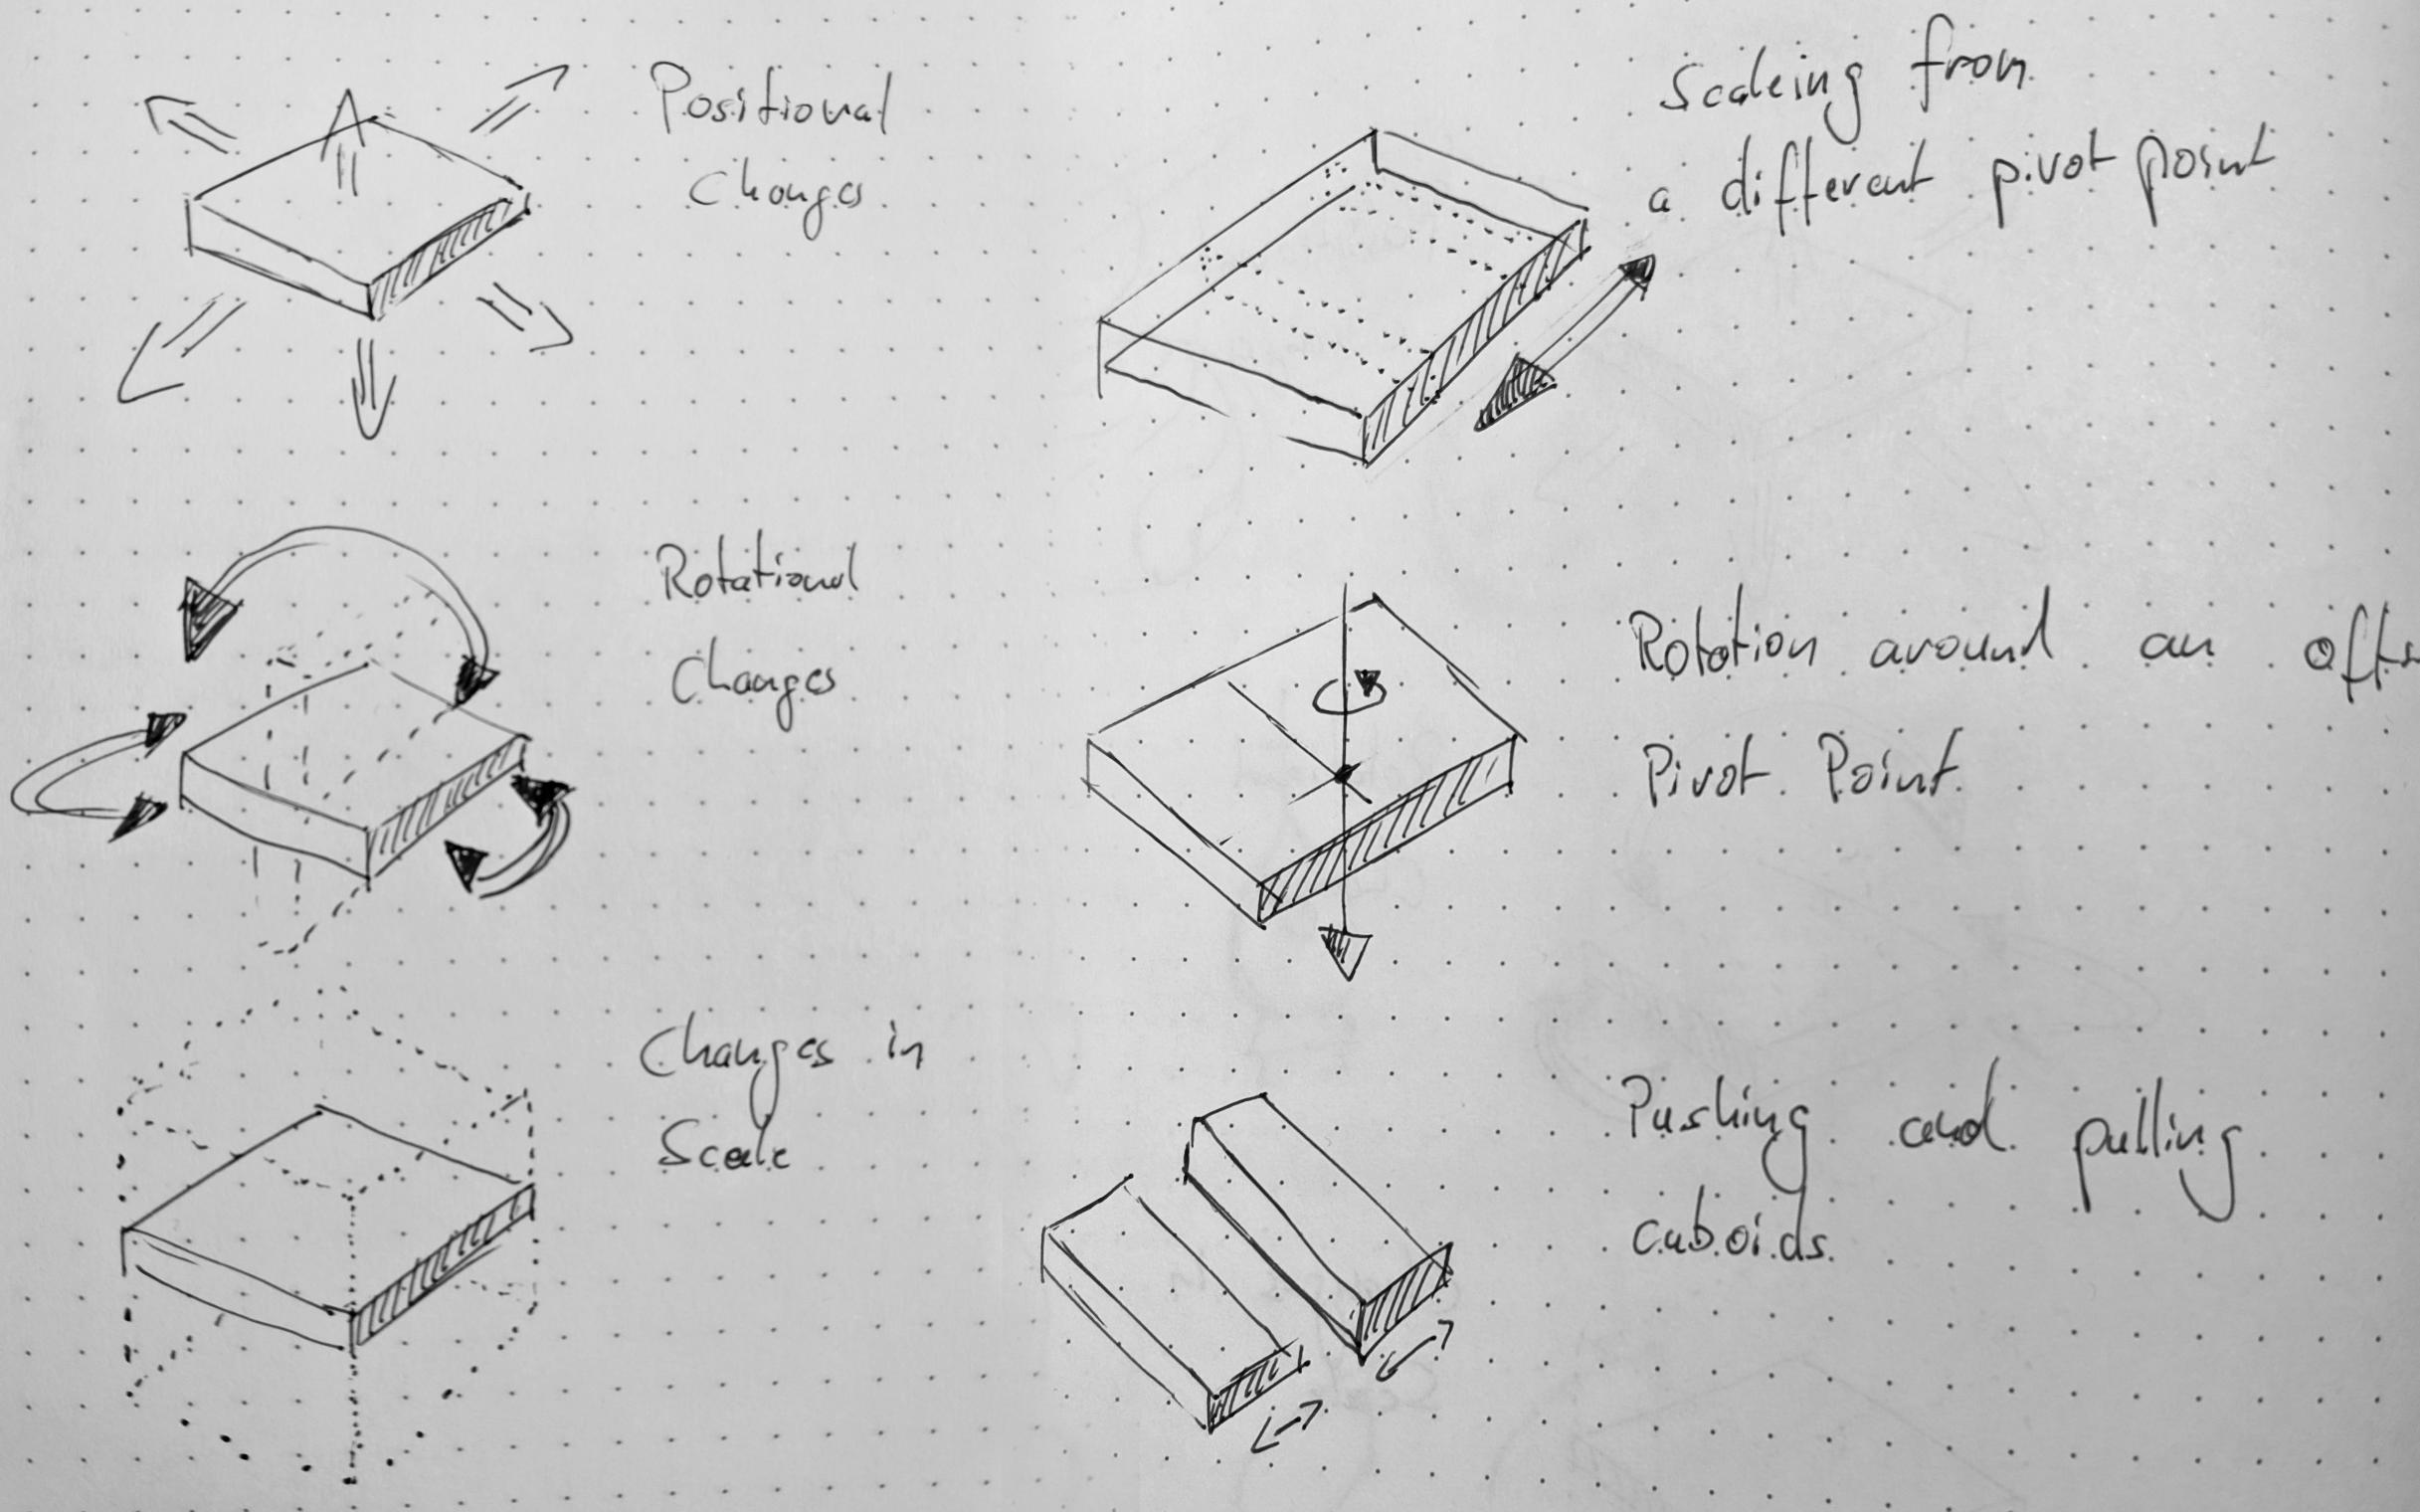
These are some scribbles I first created when thinking about these cuboids that will follow us throughout this book. These aren’t beautiful, they are just quickly done. A simple representation of what you could do with one cuboid and a basic transform.
Now you might think these redundant, but they are a simple way to remind you of what you wanted to create. They also help to iterate ideas quickly before you have to deal with coding.
Another brilliant way to prepare yourself for coding is writing in your native language what should happen inside your program. This can really help to structure your code beforehand and identify problems or hard to solve issues before you sit down and write your code. As an example:
- “If you press ‘A’ the cube should rotate left."*
Superbly simple and yet you now know what should happen. It hints at what code fragments you will need. A reference to the cube, a reference to the A key and some way to rotate the cube.
Both processes might seem excessive, but they help you get some distance and reflect about the problem at hand in a more concentrated way.
Structure of a script
Let’s write our first script. There are multiple ways to create a script, the one I prefer is creating it via right click -> C# Script in the Project View. The advantage here is: you can choose the folder in which it should locate the script and you don’t have to organize your files after the fact.
But you can also create scripts directly from the Inspector by clicking on “Add Component” and in the search panel write the name you want to give to the script. If there isn’t any other component or script with the same name in your project, Unity will assume you want to create a script with that name. I called my first script: “MovingCuboids_Lifting”.
With your script created just open it using double click. Your default Code Editor will open. This can take a while depending on your system, especially when you open the editor for the first time.
Code Editors and IDEs
Code Editors and IDEs
The default Code Editor for you probably is “Visual Studio Community Edition” or “Visual Studio for Mac”. These are so-called “IDEs” - Integrated Development Environments. These are powerful tools for editing Code, they can integrate with Unity and come with many advanced features. The downside to these is their speed. And on a laptop they can also drain on your battery, as they inspect your code in the background. Thus, if you are on a low end machine it’s wise to look for a “Code Editor”. They are a lightweight alternative, but lack some advanced features.
Brilliant Code Editors are “Visual Studio Code” by Microsoft or “Aom” by GitHub, which is also part of Microsoft. There is also Sublime Text.
If you want to check out an IDE that is becoming more and more popular with Unity programmers, look out for “Rider” by JetBrains. They also offer the very helpful Plug In “ReSharper” for Visual Studio.
Every Unity Script comes with some “boilerplate” Code to get you started. It looks like this:
	using System.Collections;
	using System.Collections.Generic;
	using UnityEngine;

	public class MyNewClass : MonoBehaviour
	{
	// Start is called before the first frame updates
		void Start()
		{

		}
	// Update is called once per frame
		void Update()
		{

		}
	}
The first few lines are “using” statements. All lines in C# that end with a semicolon are a “statement”. The “using” statements reference “namespaces” or libraries on your computer into the script. And I think libraries is a fine description for it. Think of it like a book club and you define beforehand which books you want to talk about. It’s tedious to talk about “The Lord of the Rings” if the other person hasn’t read the book.
Using these statements, you expect Unity to know about everything in the UnityEngine itself, and the chapters “Collections” and “Collections.Generic” from the “System” book. You can see we can access or require sub-parts using the so called “dot notation”.
Next up is the class. Every script we write defines a class. You could have multiple classes in the same file, but we don’t consider this good practice in C#. Classes really are an advanced topic, so for now, let’s just say they bundle a bunch of code together. Note the MovingCuboids_Lifting as the class name. This corresponds to the name we gave our script file and they always need to have the same name. If you change the class name, change the filename and vice versa.
We wrap everything that belongs into this class inside curly brackets / braces. Curly braces define a block of code. You can see this in the code for the Start() and Update() methods. All our code belongs inside the curly braces of the class, except for everything related to namespaces.
Moving on to “Methods”. Start() and Update() are methods that Unity recognizes and calls during the execution of the program. The Start() method is called first and only once before the program runs. Here you would define everything you wanted to set up.
The Update method is called each frame and keeps running until you end the program. Here we have to write all our Code that changes or animates over the time of the execution of the script.
What is a Frame?
What is a Frame?
We call the images rendered to the screen - one image at a time - a frame. If the distance between two images is short enough, we perceive this as fluid motion. They typically shoot movies with 24 Frames per Second. Unity is set up to render 60 Frames per Second, which is the most common refresh rate for Monitors.
Unity executes all your code from top to bottom. If you would move your using statements to the bottom, Unity or your IDE would start complaining.
That concludes our first brief overview of script structure.
Variables
The first Coding Concept we will dissect is “Variables” . Variables are often described as boxes with a name attached to them. You can put stuff in and later retrieve the content from the box. You can store pretty much anything in variables.
In C# variables have a “Type”. This makes C# a (mostly) “type safe” language. To stay with our box example: If you create a box you have to define what things go inside. If you have a heart-shaped box, you can only store heart-shaped things in there. If you create a round box, you can only store round things in it. For variables we don’t decide on round or heart-shaped but on types of numbers, characters and strings.
Numbers
C# comes with eleven(!) ways to talk about numbers. We will simplify this and only talk about three of them.
Number-types, Memory and Performance
Number-Types, Memory and Performance
The reason C# incorporates so many types of numbers lies in all the different use-cases of the language. You might write an application that needs to deal with super precise numbers, or especially large numbers. But these take more space in memory and take longer to calculate. In a game engine like Unity most of the time ultimate precision isn’t important – but performance is! Thus one need to choose the type of number based on the needs. You will only need to concern yourself with these in later stages of your programming journey.
The first one is integers. Integers contain all “whole” numbers no matter if positive or negative.
int integerVariable;This code declares an integer variable with the name “integerVariable”. The int is declares the type. It also reserves some space in memory for this variable. We can now access this variable without adding int again.
Right now it holds no value and if you would try to access it, you would encounter an error.
You can assign values to variables using the = sign.
int integerVariable;
integerVariable = 1;
This would initialize our integerVariable to 1. As you can see we don’t need to and actually can’t add the int keyword again.
We could also declare and initialize a variable in just one step:
int integerVariable = 1;Assignment is always done from the right side of the = sign to the left. This also means that any code on the right side will first be evaluated before we assign it to the variable on the left:
int integerVariable = 1+1;`integerVariable’ would now hold the value “2”.
Next up are “floats” and “doubles”. Both hold non-whole numbers. The difference between the two is, that double uses the double amount of memory to save values and can store higher precision values. But this also means that doubles take longer to calculate. That’s why in Unity we typically use floats, unless we absolutely need double precision. So why talk about doubles at all? Because floats are a little weird…
float floatVariable = 1.1f;
double doubleVariable = 1.1;
Look at the code above. See something fishy?
Whenever we declare or use a float, we have to append the value with a lowercase “f” to tell C# that this is indeed a float-value we want to use it as such and do not want to use a double.
float floatVariable = 1.1;If we don’t do this, our code will actually not run! The above line will cause an error. The compiler can’t know which type of value it is we want to store: double or float. The compiler always assumes the worst. As 1.1 without the f is a double it can in theory contain more precision that the float we want to store the value in. Saving it as float would result in loss of information and the compiler won’t do accept this.
The compiler will though convert values from one type to the other if he can be sure that no data loss can happen. We call this “implicit” conversion. Implicit conversion happens from integers to floats, floats to doubles and integers to doubles.
If you want to force conversion for types it’s called “explicit” conversion and we do this using a “cast”:
float floatVariable = (float)1.1;
int intVariable = (int)0.5;
You can use this syntax whenever you need to do a simple conversion between values. But note, that while the second statement works, you will have data loss. This will round the floating point value up to a whole number, a.k.a integer.
Strings
Another important Data-Type is strings. Strings contain text.
string myString = "Hello! I am text.";We declare these using the string keyword. Any string you want to assign hast to be in quotation marks.
Objects
Objects are the last important data type we really need to know about. Objects really is a generalization for many things. Unity comes with a lot of types. You can will create your own sooner rather than later.
The first things we will see are Vectors.
vector3 myVector = new Vector3(1,1,1);Vector3s are defined by Unity and bundle three floats into one variable. What’s important here is the new keyword. It tells C# to allocate some space in memory for it. If we create variables for classes, then we need to initialize them using the new keyword.
Now this might sound complicated, but for now just roll with it. We will look deeper into this once we reach the chapter about classes and object orientation.
On Pseudo Code
Throughout the first chapters we will use our “Homage to the Cuboid” as a starting point for experimentation. This will be a great way to get started coding and also see how just a few lines of code can create interesting results.
But before you code, it’s often a splendid idea to think about what you want to achieve. There is also great value in putting this down on paper. So let’s look at the options we have right now. We have been looking at the transform component in the editor, and this gives us exactly nine values to manipulate: X, Y and Z for each transformation: translation, rotation and scale.
So let’s start with translation, bringing a little snake-like movement into our homage. We will aim for something like this:

Cuboids Shifting on the X Axis
Now that we have a creative vision let’s start out with “Pseudocode”. Pseudocode is writing something code like, but on a high level. An abstraction which will make it easier to write the code itself later. You can use comments in your code to put down pseudocode. Comments start with double slashes // and everything that follows in that line will be ignored by the compiler.
We know that we can assign values to variables, and that we only want to change the value on one axis, so let’s use the X axis for now.
// x = How do we get the swinging motion? We’ll make use of a useful thing you might remember from school: A sine wave.
The sin() method will return a value between -1 and 1 based on the value we pass it. Where can we get a continuously growing value? Well: Time! So some simplified code could look like this:
//x = Sinus of TimeThis is indeed the basic idea. Now that we have that, we need to figure out how to create the offset between each of the Cuboids. We have to create some kind of Offset for them. But what do we have to Offset? If we Offset X as a whole, we just move the cuboids apart. We need to offset the value the sin() function creates and thus need to offset the time value itself. We will also need to be able to adjust this value for each Cuboid individually.
// pseudo Code
//x = Sinus of (Time + Offset per Cuboid)
So let’s get coding!
Starting our first Script
So let’s tackle this in the same order as our pseudocode. We need to access the X axis. To access the transform component of the object with our script attached Unity provides us with a nice shortcut: we can use transform. To access sub-components we use “dot notation”, like this:
transform // gets the transform component itself
transform.position // gets the position of the component as a Vector3
transform.position.x // gets the X position as a float.
And while we can “get” the X position this way, Unity does now allow us to change the value this way. We need to set the position as a whole and thus as a Vector3.
void Update(){
	transform.position = new Vector3(0,0,0);
}
This would set all our transform values to zero. But as we said, we only want to change the value for the X axis. So let’s make sure that happens by retrieving the current Y and Z values.
transform.position = new Vector3(0, transform.position.y, transform.position.z);This code will set our X value to 0, but keep the current values for Y and Z and thus all our positioning we did in the Unity Editor for these axes will stay put.
Now to get our motion going, we need to get a hold of time and calculate the sinus. We can grab the current time from the Time object using Time.time. To calculate a sin from it, we can access the “Mathf” class using Mathf.
float sin = Mathf.Sin(Time.time);Here we calculate the Sin value of the current time and store it in a float variable called sin. We can then assign it to our X position in the Vector3:
	float sin = Mathf.Sin(Time.time);
	transform.position = new Vector3(sin, transform.position.y, transform.position.z);
Well... it's a start...
While we are still missing the offset, we also have a rather strong movement, and we might want to control both.
Public and private variables
In our pseudocode, we found, we need to create an offset for each of our Cuboids. And while we could go ahead and create a script for each of them, that would be very tedious work. It would also be an awful violation of the “DRY” programming principle: “Don’t repeat yourself!". Thus we need a variable we can adjust per cuboid.
We will put this variable above the Start method but inside the class:
public class MovingCuboidsShifting : MonoBehaviour
{

    public float timeOffset = 0;
    void Start()
    {
	}
}public. Other scripts can see and set public variables. In Unity they also show up on the script component in the Inspector.
Variables exposed in the Inspector
So now we can set this value for each Cuboid separately. By default all variables and functions are private and you need not put the private keyword. But sometimes it helps to clarify your code.
Serialize Field
The
publickeyword does more than just exposing the variable to the Unity Editor. It will allow other scripts in your project to access this variable and read it or change it. And this is a gateway opening up for bugs. That’s why we want to keep our variablesprivateas long as possible. To remedy this problem, Unity offers the Tag[SerializeField]. It will expose your variable to the Unity editor and keep it hidden from other scripts. Win - Win![SerializeField] private float timeOffset = 0;This is the preferred way of working. And while it may seem like unnecessary clutter for now, this will make your life easier in the long run. Using this workflow, all the decisions you make regarding making variables public will be conscious.
Variable Scope
The last thing regarding variables we need to talk about is “variable scope”. Scope is about which variables you can access, at which point in your code. In our code we have two places in which we create variables. On top of the class and inside the Update loop. Variables you create at the top of the file, or to be precise directly inside the braces of the class have “global scope”. We can access them in any function or loop inside the class.
Variables you create inside a method like Update() or Start() have “local scope”. We can only access them inside the method or loop we created them in.
public class exampleClass : MonoBehaviour{
private int myInteger = 0; // This is at global scope
Start(){
private int myOtherInteger = 0; // This is at local scope
myInteger = 1; // This works
myOtherInteger = 1; // This works as well
}
Update(){
myInteger = 2; // This works
myOtherInteger = 2; // This DOES NOT WORK!!
}Putting it in practice
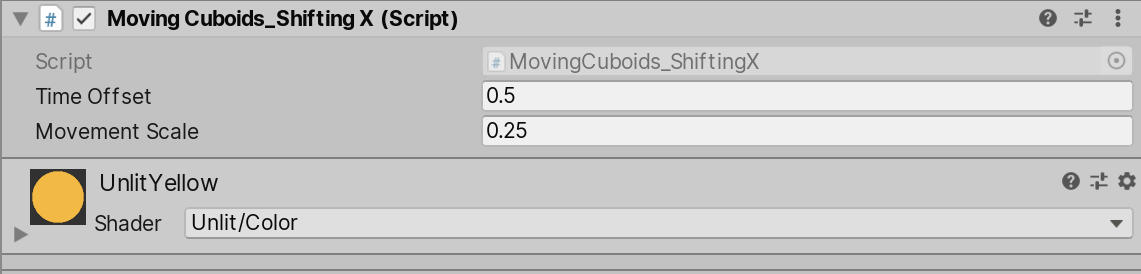
Now that we have a value we can adjust, let’s incorporate it into our script:
[SerializeField]
private float timeOffset = 0;
void Update()
{
float sinus = Mathf.Sin(Time.time + timeOffset);
transform.position = new Vector3(sinus, transform.position.y, transform.position.z);
}Last, we want to add a scaling factor on the movement range of the cuboids:
float movementScale = 0.25f;Now we can ask the interesting question where to put this. And there are actually many options, but let’s consider the obvious ones:
[SerializeField]
private float timeOffset = 0;
float movementScale = 0.25f;
    void Update()
    {
        float sinus = Mathf.Sin(Time.time + timeOffset) * movementScale;
        transform.position = new Vector3(sinus, transform.position.y, transform.position.z);
    }
And:
[SerializeField]
private float timeOffset = 0;
float movementScale = 0.25f;
    void Update()
    {
        float sinus = Mathf.Sin(Time.time + timeOffset);
        transform.position = new Vector3(sinus * movementScale, transform.position.y, transform.position.z);
}[SerializeField]
public float timeOffset = 0;
float movementScale = 0.25f;
void Update()
{
float sinus = Mathf.Sin(Time.time + timeOffset);
sinus = sinus * movementScale;
transform.position = new Vector3(sinus, transform.position.y, transform.position.z);
}When and where you put your operations depends on the situation, partly depends on style but should mostly be about readability. Which of these would you think is most clear to any other person reading this?
You could even create a new variable for the scaled sinus which is very precise and thus an excellent way to write your code.
[SerializeField]
private float timeOffset = 0;
float movementScale = 0.25f;
    void Update()
    {
        float sinus = Mathf.Sin(Time.time + timeOffset);
        float scaledSinus = sinus * movementScale;
        transform.position = new Vector3(scaledSinus, transform.position.y, transform.position.z);
    }
Whichever way you choose. You should now have something like this happening. You can pat yourself on the back. All of this an important first step!
Cuboids Shifting on the X Axis
Rotation
While scaling will be very similar to what we just did, rotation can be a little harder. But this totally depends on your needs. If you only need to rotate an object around an axis, rotation can be as simple as:
transform.Rotate(0, 1, 0);This would rotate the object around the Y axis by a value.
What you can’t do however is assign a Vector3 directly to the Rotation value. Rotations in Unity are stored in Quaternions. Quaternions take in four values and help to avoid some problems with rotations in 3D space. To set Rotation values, you would need to use this method:
transform.rotation = Quaternion.Euler(0,1,0);
RotatingCuboids
The full script for this looks like this:
using System.Collections;
using System.Collections.Generic;
using UnityEngine;
public class MovingCuboidsRotating : MonoBehaviour
{
    [SerializeField]
    private float valueToRotatePerFrame = 1f;
    [SerializeField]
    private float timeOffset;
    void Update()
    {
        float sinRotation = Mathf.Sin(Time.time * .5f + timeOffset) * valueToRotatePerFrame;
        transform.Rotate(0, sinRotation, 0);
    }
}
Projects
Project 1 - Variants
To conclude this chapter I again would like to ask you to spend some time and play with the concepts you learned in this chapter some more. Here are some things I came up with you could achieve only using the concepts we introduced so far.

Cuboids Scaling on X and Z
MovingCuboidsScalingXZ.cs

Cuboids moving on the Y Axis
MovingCuboidsLifting
Project 2 - Space Exploration

Space Exploration
RotateVector.cs
This project is a little more advanced as it uses external models again and you will need to make use of parenting in the hierarchy view.
Download the Assets here:
The key to recreating this sketch in parenting. We can place a planet at the center of the scene (Position 0/0/0) and add a script to rotate it. We can also use this script and attach it to an “empty GameObject” at the center of the scene. This is a very common way to set up relationships in 3D. If you look at the Rockets themselves, you will see that I set them up in the same way. This allows us to still have some kind of control over the objects in Unity. I.e. we could scale the legs of windows of the spaceships to our liking.
You can now position the spaceship somewhere in the orbit of the planet. Once you switch to playmode your spaceship should fly around the planet in the way you set up the empty in object in the center.
For the flame we can again just go ahead and create a script that oscillates the size. We can also add our Rotation script to give even more liveliness to the flames. But this is all up to you and your creativity.
SinusFire.cs
Important to see here is how much you can actually create with just a few very small scripts attached to objects.
You can then go ahead and play with materials, colors and lights for your scene. I personally think it can be especially fun to play with the camera and get interesting views on one and the same sketch. That’s one of the great things about working in three dimensions of course!